19
Writing Instructions
Organizations need instructions that help employees produce goods and services efficiently and safely, and customers often need instructions in order to use those goods and services. When these important how-to documents are well written, they help organizations run smoothly and successfully. On the other hand, poorly written instructions can lead to frustrated customers, expensive errors, personal injuries, and lawsuits.
This chapter will help you write effective instructions. Guidelines and models will show you how to use tools such as lists, numbered steps, and photographs or drawings to get your message across. At the end of the chapter, a checklist will identify areas for special attention and suggest ways to edit your document.
In this chapter
Guidelines Writing Instructions
Your goal is to break down a task into logical steps and describe those steps so clearly that a reader can do the task.
-
Plan: (Ideas and Organization)
Make sure that you know your subject well: the materials needed to do the task, the number of people required to complete the task, starting and finishing times, and the steps in the process.
Think about your reader.
Is the reader familiar with the setting, the process, the equipment, the personnel needed, technical terminology, and the English language?
-
Draft: (Ideas, Organization, and Voice)
Opening Introduce the process by
-
describing it briefly, explaining its importance, and stating its goal.
-
listing materials, equipment, and tools needed to get the job done.
Middle Tell the reader what to do by
-
giving numbered, step-by-step instructions that use command verbs, short sentences, and precise terms for materials, tools, and measurements.
-
stating clear WARNINGS (potential for danger or injury), cautions (possible error or damage to equipment), and notes (tips or clarification on how to do the task).
-
including clear, well-placed photos, drawings, or diagrams.
Closing State the desired outcome and any final reminders.
-
-
Revise: (Ideas, Organization, Voice, Words, and Sentences)
-
Have you used numbered steps to help the reader move back and forth easily between the task and the instructions?
-
Have you grouped closely related actions in chronological order?
-
Have you read the instructions to a listener to see if the person can complete the task?
-
-
Edit: (Conventions and Design)
-
Are WARNINGS in boldface and caps and cautions in boldface?
-
Are spelling, labels, numbers, and terms accurate?
-
Do graphics, photos, and drawings enhance the message?
-
“Nothing is particularly hard if you divide it into small jobs.”
—Henry Ford
Writing Instructions with a List of Materials
Instructions for Closing Off the Cash Register
Opening: Identify the task by using a clear title. Follow the steps below in order to (1) close off the cash register and (2) account for the day’s receipts.
List materials and/or tools. Materials needed: Daily Account Form, deposit bag, calculator, pen, and paper
Middle: Present steps in chronological order. Steps:
-
MAKE SURE THE STORE’S DOORS ARE LOCKED. Then take the cash tray out of the register drawer and place the tray on the counter. (Leave the empty drawer open to deter thieves.)
-
Use short sentences with command verbs. Turn the cash-register key to the X setting and press the X key. The machine will print the X reading: the total amount of receipts for the day.
-
Turn the key to the Z setting and press the Z key. The machine will print the Z reading: itemized, department-by-department subtotals.
-
Use few (if any) pronouns. Count out $200.00 and place the bills in the envelope marked “FLOAT”; currency amounts are shown on the envelope. (The float is the $200.00 of cash placed in each cash register when the store opens.) The remaining cash, checks, and credit-card slips make up the day’s receipts. Do not place the float back in the drawer.
-
Place WARNINGS in boldface and caps; place cautions in boldface only. Total the day’s receipts using a calculator, and check the total against the X reading. If the totals differ, count the receipts a second time and a third time if necessary. Write a note indicating any difference and attach the note to the receipts.
-
Fill out the Daily Account Form by entering the X reading total and the Z reading total and then the totals of the day’s receipts. Place the day’s receipts in the deposit bag.
-
Lock the following in the safe: (1) the deposit bag, (2) the Daily Account Form, (3) the X and Z printouts, and (4) the envelope marked “FLOAT.”
Closing: Review a key point. DOUBLE-CHECK THE SAFE DOOR TO MAKE SURE IT’S LOCKED.
Writing Instructions for a Procedure
Regis City Hospital
HAND-WASHING PROCEDURE
Opening: Identify the task. Perform this procedure whenever you report for duty and before and after providing care for a patient. Also use this procedure after bathroom use, eating, coughing, or sneezing, and before and after using sterile gloves, gowns, and masks. Explain when to do the procedure and how to prepare to do it. Whenever in doubt, wash your hands.
Caution: Rings and other jewelry harbor bacteria and are difficult to clean. Before reporting for work, remove all jewelry.
Middle: List steps in chronological order. Steps in the Procedure:
-
Remove the first paper towel, and place that towel in the wastebasket.
-
State WARNINGS in boldface and in caps. Take the next paper towel and use it to turn the water on to a comfortable temperature. DO NOT TOUCH THE CONTROLS WITH YOUR HANDS.
-
Put your hands and wrists under the running water, keeping your fingertips pointed downward. Allow the water to flow gently.
-
Once your hands and wrists are completely wet, apply antiseptic solution.
-
With the fingertips of your opposite hand, circle each finger on the other hand with a rotary motion from base to tip. Pay careful attention to the area between your fingers, around nail beds, and under your fingernails.
-
State cautions in boldface without full caps. Rinse your hands well under running water. Hold your hands down so that the direction of the water flow is from the wrist to your fingertips.
-
State notes in regular type. Pat your hands dry with a clean paper towel, and turn off the water with the towel. Discard the paper towel into the waste basket.
Bring your hands together and create a heavy lather. Wash at least three inches above the wrists, and get soap under your fingernails and between your fingers. Wash well for one full minute.
Closing: End with a final point. Note: If your hands touch the sink, faucet, or spout, repeat the entire procedure.
Writing Instructions for a Policy Procedure
Opening: Identify the topic. Family and Children’s Coalition
Confidentiality Procedures
State and summarize the policy. The Family and Children’s Coalition Confidentiality Policy states that all clients have the right to confidentiality. Conduct your work in keeping with this policy by following the procedures below.
Middle: Use clear headings throughout. Client Intakes:
During the client intake, the Coalition counselor should discuss the conditions of confidentiality with the client. These conditions include the following:
-
Information will never be shared unless the client has given written permission using the Consent to Release Form.
-
Note: The passive voice may be used to emphasize key points. Confidentiality may be limited or canceled if Coalition staff have serious concerns about child abuse or neglect, or if the client is a danger to herself or himself, or to others.
Outside Requests for Information:
Coalition counselors will handle outside requests for client information.
-
List steps clearly, including which documents to complete and submit. No client information will be shared without the client’s written permission.
-
Clients will be notified of any outside requests for information. To give permission, the client must sign the Consent to Release Form and specifically indicate what information may be released and to whom. A Coalition counselor must also sign the release form.
Breaches of Confidentiality:
If a client believes that Coalition staff have not observed the confidentiality policy and procedures, the client should be directed to follow the Client-Grievance Process.
Closing: Close with a fitting summary or restatement. By carefully following the procedures above, the Coalition staff can help their clients while also respecting the clients’ rights to confidentiality.
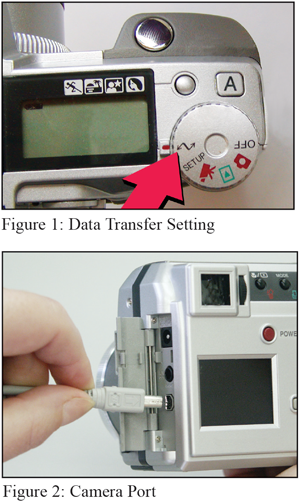
Writing Instructions Containing Photographs
Opening: Use a descriptive title. Note or list materials needed. Downloading Photographs from the MC-150 Digital Camera
Note: MC-150 software must be loaded on your computer to download photographs from the camera.
-
Middle: Give steps and photos in chronological order. Turn your computer on.
-
Plug the camera’s USB cable into your computer.
-
Turn the camera’s mode dial to the data transfer setting (Figure 1).
-
Add graphics (such as the arrow) to create a quick visual cue. To show an object’s size, use a reference (such as the fingers). Open the camera’s flash-card door and plug the other end of the USB cable into the camera port (Figure 2).
-
Select USB transfer from the camera screen menu. The MC-150 software will then launch onto your computer.
-
Follow the instructions on the computer screen to download all of your photos or specific photos.
-
Boldface words that need special attention. When your download is complete, turn the camera off and unplug the USB cable from the camera and the computer.
Closing: Note common problems that are easily solved. Note: If MC-150 software doesn’t launch, disconnect the camera (step 7), and then restart the computer and continue on from step 2.
Writing Instructions with Drawings
Instructions for Replacing Auger Bearing on Bale-Press 64-D
Opening: Identify topic. Use the instructions below to replace the right, rear auger bearing on the Bale-Press 64-D.
Parts Needed:
List the parts needed in a table format. If helpful, add illustrations. Item No. |
Quant. |
Part No. |
Descript. |
1 |
1 |
RRAB 20024 |
right, rear auger bearing |
2 |
1 |
RRASP 20007 |
right, rear auger-support post |
3 |
2 |
BLT 5/8X3.5HX |
5/8” x 3 1/2” hex bolt |
4 |
2 |
NUT 5/8HX |
5/8” hex nut |
5 |
2 |
CP 1/8X2 |
1/8” x 2” cotter pin |
Indicate danger with a WARNING message in caps and in bold print. Use an icon, if helpful. WARNING: SHUT OFF ENGINE AND REMOVE KEY!
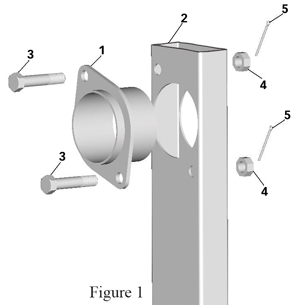
Steps:
-
Take out the existing bearing by removing the two 1/8” cotter pins, two 5/8” nuts, and two 5/8” bolts. (See Figure 1.)
-
Give steps in chronological order. Insert the new bearing (item #1) into the 4 3/8” hole on the post (item #2).
-
Use the same terms in the steps as were used in the parts list. Fasten the bearing to the post with two 5/8” bolts (item #3), two 5/8” nuts (item #4), and two 1/8” cotter pins (item #5).
Place the illustration next to the steps. Note: For ease of installation, insert both of the bolts before tightening the nuts.
Closing: Use cautions (boldface without caps) to warn of damage. Caution: For safe installation, fasten the replacement bearing with the new bolts, nuts, and cotter pins included in the replacement kit.
Checklist Writing Instructions
Your goal is to break down a task into logical steps and describe those steps so clearly that a reader can do the task.
My writing . . .
-
identifies the task and lists all the parts, materials, and tools needed.
-
explains step-by-step what to do and how to do it.
-
uses accurate measurements of time, distance, length, height, and so on.
-
includes clear and appropriate warnings, cautions, and notes.
-
-
opens with a clear title and introduction that identify the procedure.
-
has a middle with numbered steps: each step has a single, clear action.
-
includes a conclusion that summarizes or clarifies the process.
-
-
writes clearly and confidently about the subject.
-
addresses sensitive issues directly, but tactfully.
-
-
uses words appropriate for the situation and reader.
-
identifies parts using the same terms in lists, steps, and illustrations.
-
states notes, cautions, and warnings clearly, without alarm.
-
-
states steps in crisp phrases or sentences using command verbs.
-
includes clear transitions where needed.
-
-
cites accurate specifications, names, titles, quotations, and figures.
-
includes error-free grammar, punctuation, capitalization, and spelling.
-
-
uses headings, numbers, and graphics to organize information.
-
includes illustrations that are labeled, readable, and set off with white space.
-
uses correct format for signal words such as notes (regular type), cautions (boldface), and WARNINGS (boldface and caps).
-
“Experience is the worst teacher. It always gives the test first and the instruction afterward.”
—Vernon Law